Smart Links for Affiliate Marketing: Tools, Comparisons & Setup Guide [2026]
Smart links for affiliate marketing are URLs that automatically detect a viewer’s country and device, then route them to the correct merchant storefront with your affiliate tag attached. They combine geo-targeting, deep linking, health monitoring, and branded short URLs into a single link — and they are the single biggest upgrade most affiliate marketers can make to increase revenue without creating more content.
TL;DR: If you use regular affiliate links, you are losing commissions from every international viewer and every mobile user who lands in a browser instead of the merchant app. Smart links fix both problems automatically. This guide covers what smart links do, how every major tool compares, and how to get started for free.
Most YouTube creators and affiliate marketers leave money on the table without knowing it. You put an amazon.com link in your description, 30% of your audience clicks from the UK or Germany, and those clicks earn you zero — because your US affiliate tag does not work on amazon.co.uk. Smart links solve this, along with half a dozen other revenue leaks you probably have not noticed yet. This page is the hub for everything you need to know.
What Are Smart Links?
A smart link is a single URL that detects where your viewer is located and what device they are using, then sends them to the right store with the right affiliate tag. Instead of pasting a raw amazon.com link that only works for US audiences, you paste one smart link that routes Americans to amazon.com, Brits to amazon.co.uk, Germans to amazon.de — each with your local affiliate tag.
Smart links typically include four core features:
- Geo-targeting — route clicks to the viewer’s local storefront
- Deep linking — open merchant apps on mobile instead of the browser
- Health monitoring — detect broken destinations before they cost you money
- Branded short URLs — clean links like youfil.to/headphones instead of a 200-character Amazon URL
For a deeper breakdown of how each feature works and when you need them, read the full explainer: What Are Smart Links? The Complete Guide for Affiliate Marketers.
Smart Links vs Regular Affiliate Links
Regular affiliate links have three fundamental problems that smart links eliminate:
- No international routing. A US Amazon link sends UK viewers to amazon.com, where your Associates tag does not apply. That click earns nothing.
- No app opening. Mobile viewers land in YouTube’s in-app browser, which blocks cookies and reduces conversion rates. Smart links with deep linking open the Amazon app directly.
- No visibility into broken links. Products get discontinued, URLs change, pages 404. Regular links break silently. Smart link platforms monitor destinations and alert you.
The revenue difference is not marginal. Creators with 20-40% international audiences routinely see a 15-30% commission increase after switching to smart links — purely from capturing traffic they were already getting.
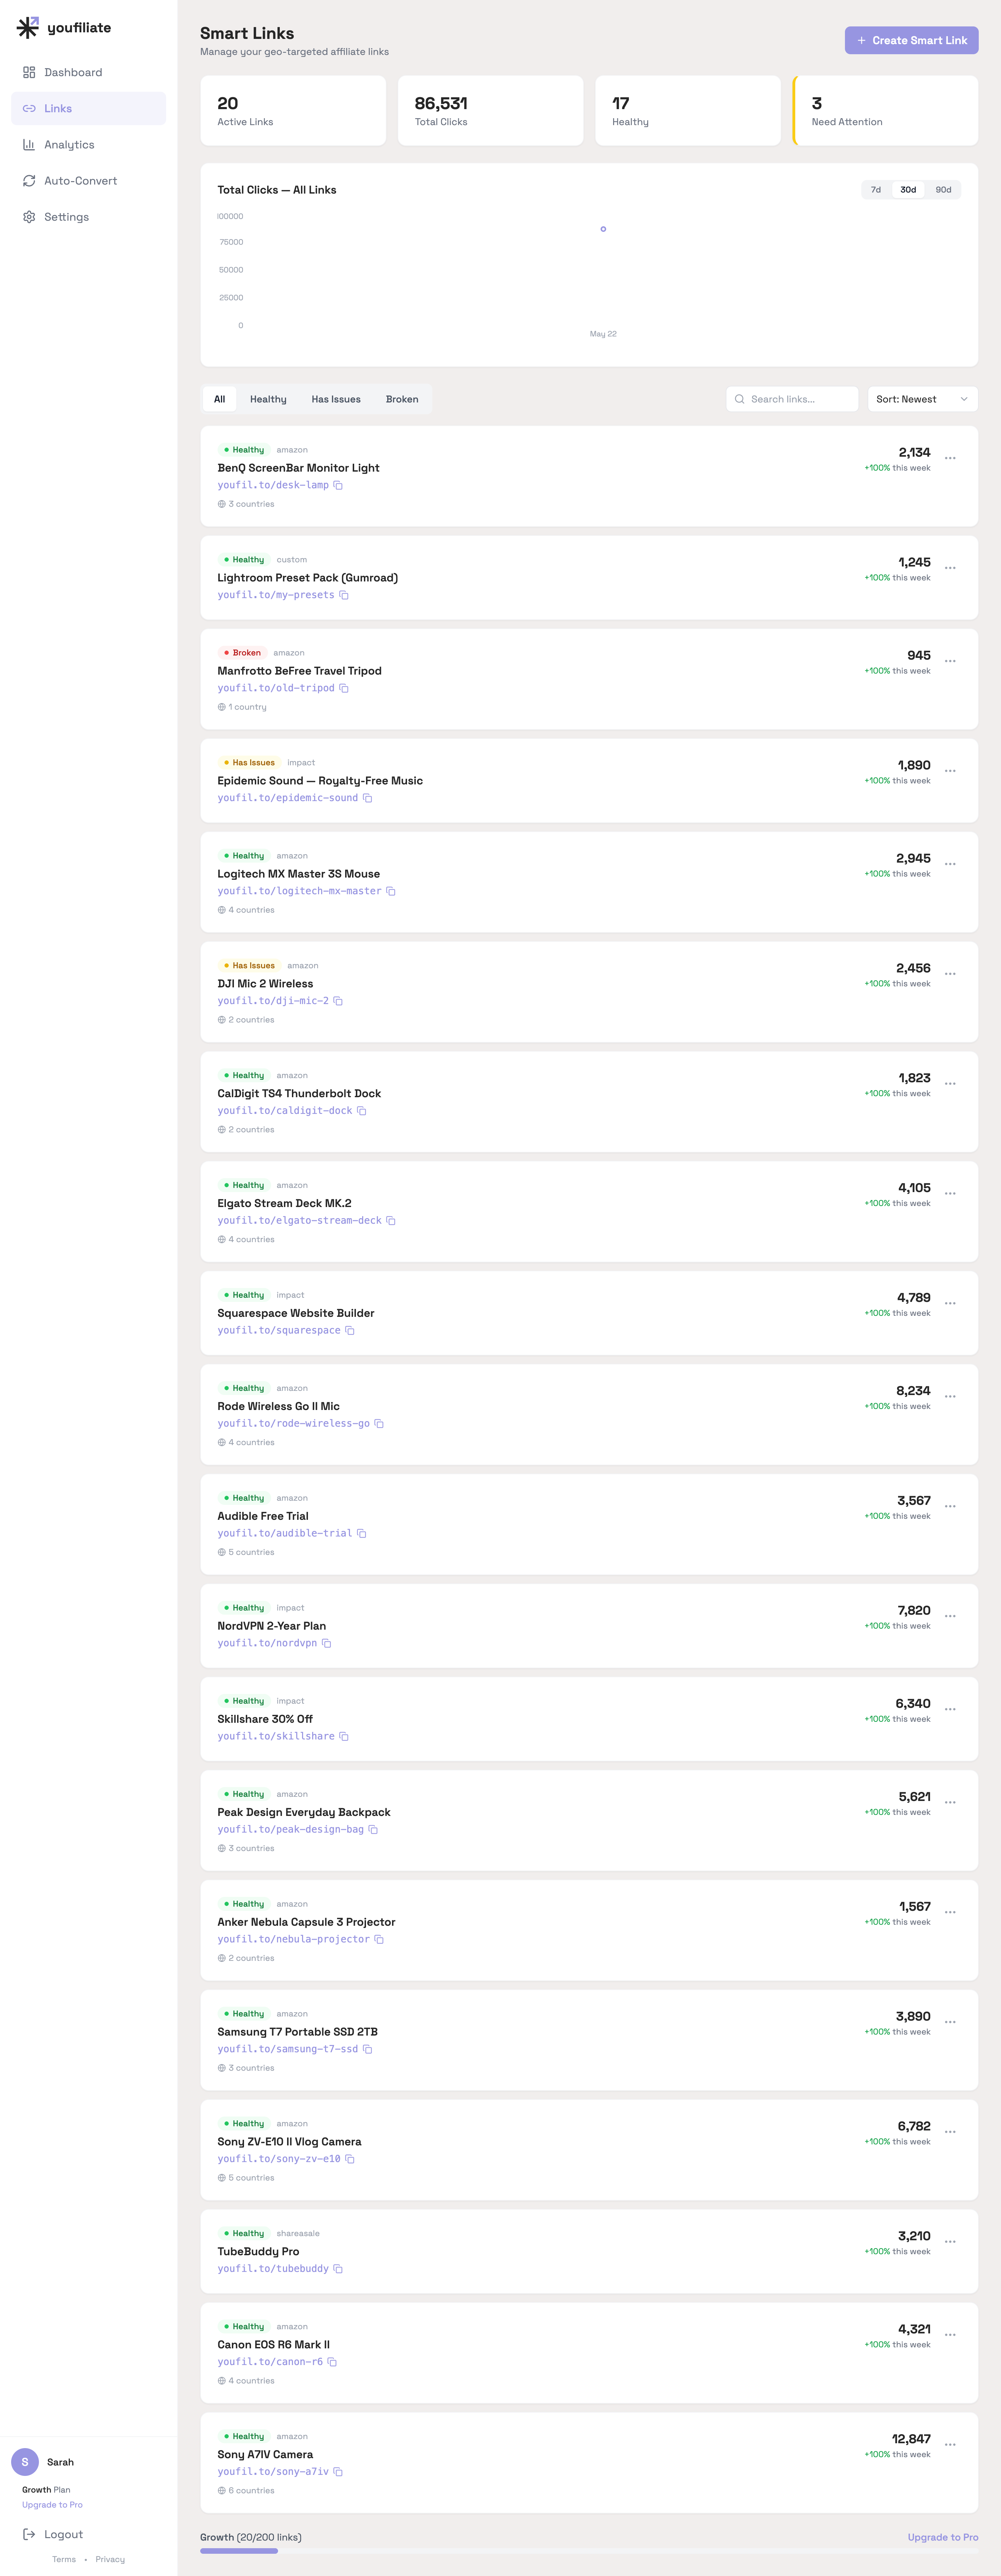
That dashboard view is what a creator catalog actually looks like in production: a mix of large links and long-tail links, a small portion (15% in this case) flagged degraded or broken at any given week, and the same dashboard showing both per-link clicks and the channel-wide trend.
Geo-Routing: Why It Matters
Between 20% and 40% of a typical YouTube channel’s audience is outside the United States. For tech review channels, gaming channels, and lifestyle creators, that number can be even higher. Without geo-routing, every one of those international clicks is a wasted opportunity.
Here is what happens without geo-targeting: a viewer in Germany clicks your amazon.com link, lands on the US store, and either leaves or gets redirected to amazon.de — but without your affiliate tag. You did the work of earning that click and got nothing for it.
Geo-routing fixes this by maintaining separate affiliate tags for each Amazon marketplace (or other merchant) and routing viewers to their local store automatically. The best tools handle this with zero extra work from you — you provide one link, the tool figures out the rest.
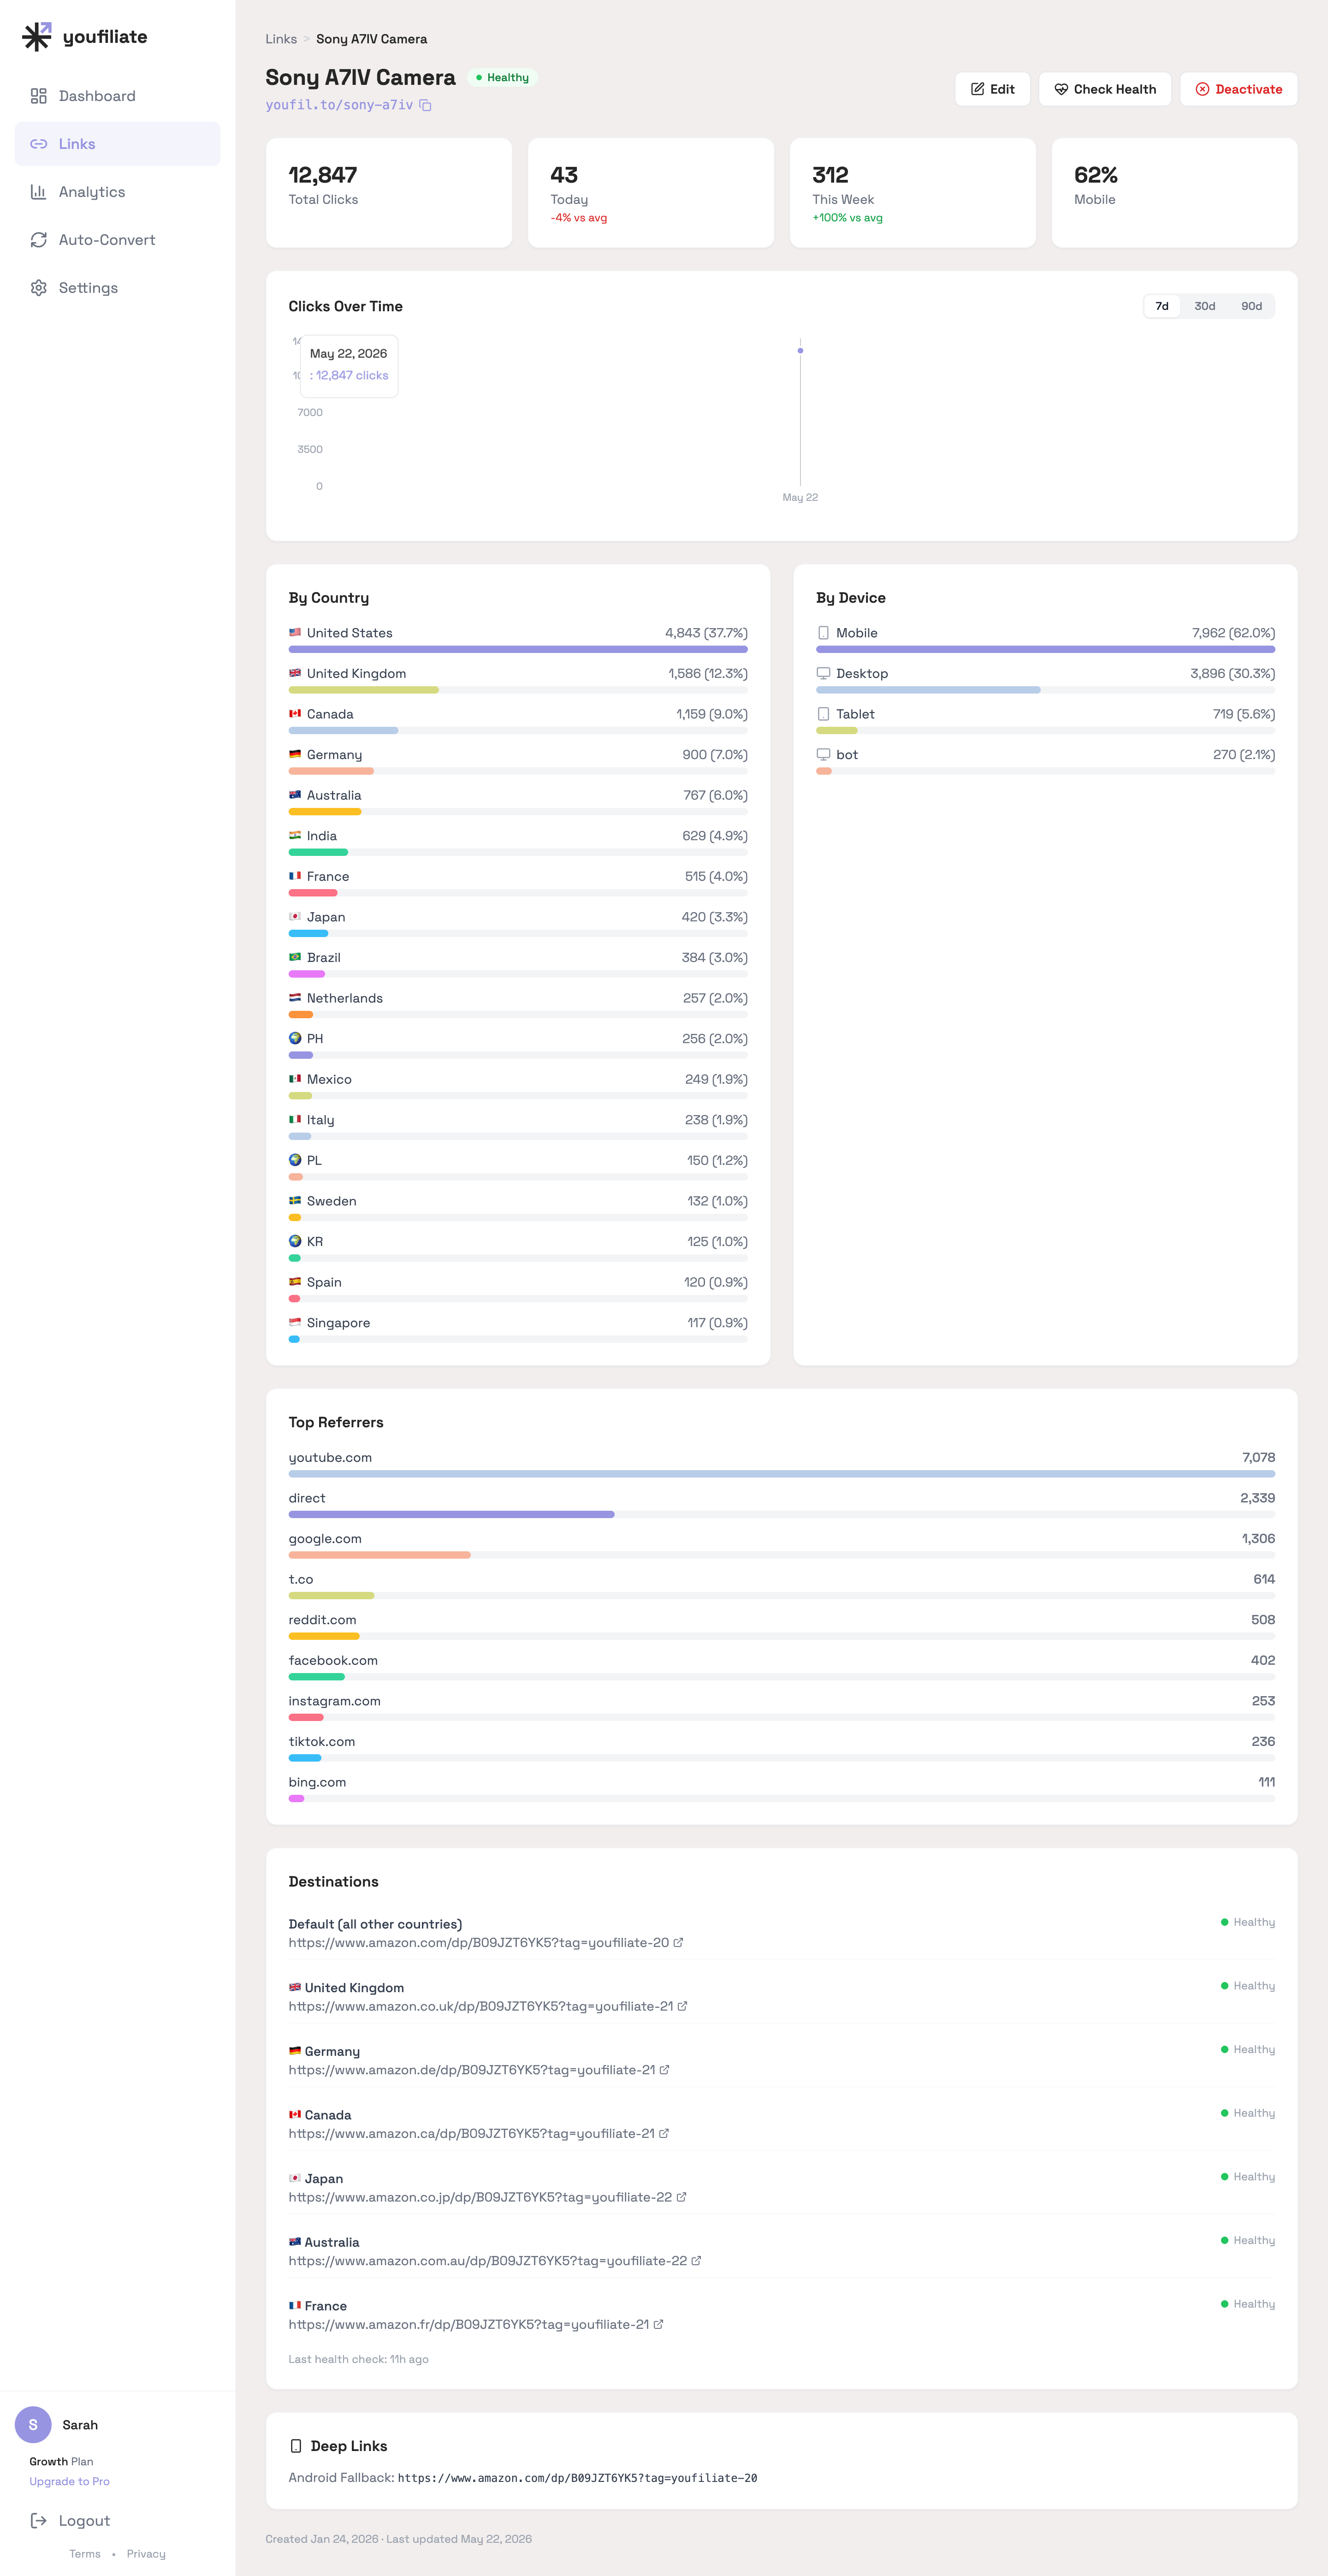
The per-link view is where geo-routing pays for itself: you can see exactly how much of a single link’s traffic is non-US (in this Sony A7IV example, US is 37.7%, UK 12.3%, Canada 9.0%, Germany 7.0%, Australia 6.0% — meaning over 60% of the clicks need a non-default destination to convert).
Go deeper on this topic:
Deep Linking: Opening Merchant Apps on Mobile
Over 60% of YouTube views happen on mobile devices. When a mobile viewer clicks a regular affiliate link, they land in YouTube’s in-app browser — a stripped-down browser that often blocks cookies, does not support saved logins, and kills conversion rates. Many viewers simply close it.
Deep linking solves this by opening the merchant’s native app instead. A viewer with the Amazon app installed taps your link and goes straight to the product page inside the app, where they are already logged in and one tap away from purchasing. Conversion rates on in-app purchases are significantly higher than mobile browser.
Smart link tools that support deep linking detect the viewer’s device (iOS or Android), check whether the merchant app is available, and route accordingly. If the app is not installed, the viewer falls back to the mobile web store or gets directed to the app store — depending on your configuration.
Related deep dive: What Is Deep Linking for Affiliate Links?
Health Monitoring: Catching Broken Links Before They Cost You
Broken affiliate links are silent revenue killers. Products get discontinued, merchants restructure URLs, affiliate programs change their link formats, and pages return 404 errors. If you have 50 videos with 5 affiliate links each, that is 250 links that could break at any time — and you will not know unless you check manually.
Smart link platforms solve this with automated health monitoring. They check each destination URL on a schedule (daily, weekly, or on-demand) and alert you when something breaks. Some platforms, like Youfiliate, a smart links platform built for YouTube creators, go further by monitoring every geo-rule destination separately — because your US link might work fine while the UK destination is dead.
The math is straightforward: one broken link on a video that gets 100 clicks per day is costing you money every single day it goes unfixed. Automated monitoring pays for itself almost immediately.
Tool Comparison: Geniuslink vs Youfiliate vs OneLink vs Others
This is the section most people came here for. Here is how the major smart link tools compare:
Geniuslink
The most established smart link tool for affiliate marketers. Solid feature set including geo-targeting, deep linking, click analytics, and API access. The catch: per-click pricing. You pay $5 base plus roughly $2 per 1,000 clicks. At 50,000 clicks/month, you are paying around $105/month. At 200,000 clicks, it is over $400/month.
Geniuslink is a good tool with an expensive pricing model for creators at scale. Full comparison: Geniuslink vs Youfiliate.
Youfiliate
Youfiliate is a smart links platform built specifically for YouTube creators. It offers geo-targeting, deep linking, health monitoring, branded short URLs (youfil.to), and YouTube auto-convert (update all your video descriptions in one click). The key difference: flat-rate pricing starting at $9/month with unlimited clicks. Your costs stay the same whether you get 1,000 clicks or 1,000,000.
Free tier available with 10 smart links — enough to test the concept on your top-performing videos. Connect your YouTube channel and the auto-convert preview will show you every affiliate URL in your descriptions so you can pick the ones to upgrade first.
Amazon OneLink
Amazon’s free built-in geo-targeting tool. It works — sometimes. OneLink relies on product matching to find equivalent ASINs across international stores, and that matching frequently fails. It does not support deep linking, does not monitor for broken links, and only works with Amazon. If Amazon is your only affiliate program and you do not care about mobile app opens, it is worth trying. But most creators outgrow it quickly.
Deep dive: Geniuslink vs Youfiliate covers the OneLink comparison alongside Geniuslink. For an Amazon-specific setup walkthrough, see auto-localize Amazon affiliate links.
LinkTwin
A smart link tool focused on Amazon affiliates. Supports geo-targeting and has a browser extension for link creation. Does not offer YouTube auto-convert or description bulk updating, which means you are manually replacing links across your back catalog.
URLgenius
Primarily a deep linking platform rather than a full smart link tool. Strong at opening merchant apps but lighter on geo-targeting and health monitoring features. Per-click pricing similar to Geniuslink.
For the head-to-head against the most established competitor, see Geniuslink vs Youfiliate.
Pricing: Per-Click vs Flat-Rate
Smart link pricing falls into two models: per-click and flat-rate. The difference matters more than most creators realize.
Per-click pricing (Geniuslink, URLgenius) charges based on how many clicks your links receive. This sounds fair until your channel grows. A video going viral can spike your link tool bill from $20 to $200 in a single month. You are essentially penalized for success.
Flat-rate pricing (Youfiliate) charges a fixed monthly fee regardless of click volume. Your cost is predictable, and you keep more revenue as your audience scales.
Here is a quick comparison at different traffic levels:
| Monthly Clicks | Geniuslink Cost | Youfiliate Cost |
|---|---|---|
| 10,000 | ~$25/mo | $9/mo |
| 50,000 | ~$105/mo | $19/mo |
| 200,000 | ~$405/mo | $49/mo |
| 500,000 | ~$1,005/mo | $49/mo |
The gap widens dramatically at scale. Full pricing breakdown with more tools included: Smart Link Pricing Compared at Scale.
Setting Up Your First Smart Link
Getting started with smart links takes about five minutes:
- Sign up for a smart link platform. Youfiliate offers 10 free smart links — no credit card required.
- Paste your existing affiliate link. The tool detects the merchant and product automatically.
- Add geo-rules. Set destination URLs for each country you want to target. Most tools auto-suggest international equivalents for Amazon products.
- Enable deep linking. Toggle on app-opening for iOS and Android if your platform supports it.
- Replace your old link. Swap the raw affiliate link in your YouTube description (or wherever you share it) with the new smart link.
- Monitor. Check your analytics dashboard to see clicks by country, device, and referrer.
If you have a large back catalog of videos, look for a platform with YouTube auto-convert — Youfiliate can scan your existing descriptions and replace old links with smart links across all your videos in one click.
If you have a back catalog of 50+ videos, the auto-convert step is the unlock — connect your YouTube channel once and Youfiliate replaces every affiliate URL across every description in a single pass, with a preview step before anything is written.
Using Smart Links Across Platforms
Smart links are not just for YouTube. Any platform where you share affiliate links benefits from geo-targeting and deep linking:
- YouTube — the primary use case. Descriptions, pinned comments, community posts.
- Substack — newsletter affiliate links face the same international problem; one smart link per product works across every issue.
- Discord — server links shared with global communities lose commissions without geo-routing.
- Threads — mobile-first platform where deep linking is especially valuable.
- Instagram and TikTok — link-in-bio and story links benefit from both geo-routing and app opening.
The beauty of smart links is that one link works everywhere. You create it once, and it handles routing regardless of where the viewer clicks from or which platform they are on.
What I See Running Smart Links in Production
Three things that don’t show up in feature comparisons but show up clearly in the click data:
- Health-status drift is real. Across a creator catalog of 20 active smart links, roughly 15% are flagged degraded or broken at any given week (in our demo dataset: 17 healthy, 2 degraded, 1 broken — a Manfrotto tripod that hit a 404 from Amazon). Without monitoring, that’s revenue silently leaking from your back catalog.
- The mobile gap is huge. Across 86,531 click events on the demo catalog, mobile is 62%, desktop 30%, tablet 5.6%. If you don’t have deep linking turned on, almost two-thirds of your clicks are going into a mobile browser they’ll abandon faster than the merchant app.
- Top six countries cover ~85-90% of international value. US 38%, GB 12%, CA 9%, DE 7%, AU 6%, IN 5%, FR 4%. Geniuslink’s “19+ Amazon storefronts” sounds bigger than it actually matters — six well-configured rules captures almost all the upside.
Frequently Asked Questions
What is a smart link in affiliate marketing?
A smart link is an affiliate URL that automatically detects the viewer’s country and device, then routes them to the correct merchant storefront with your affiliate tag attached. It combines geo-targeting, deep linking, and link health monitoring into a single URL. Instead of pasting a raw amazon.com link that only works for US viewers, you paste one smart link that sends each viewer to their local store — amazon.co.uk for UK viewers, amazon.de for German viewers — with the appropriate affiliate tag for each marketplace.
Are smart links worth it for small YouTube channels?
Yes, if you have any international traffic at all. Even a channel with 1,000 views per month likely has 200-400 international viewers whose clicks currently earn nothing. Smart links capture that revenue from day one. Most platforms offer free tiers — Youfiliate gives you 10 free smart links, which is enough to cover your highest-traffic videos. The ROI is almost immediate because you are monetizing traffic you already have.
How much do smart link tools cost?
Pricing varies significantly by model. Geniuslink charges per-click ($5 base plus roughly $2 per 1,000 clicks), which scales up quickly — expect $100+/month at 50,000 clicks. Youfiliate uses flat-rate pricing starting at $9/month with unlimited clicks. Amazon OneLink is free but only works with Amazon and has limited features. The right choice depends on your traffic volume and which merchants you promote.
Can I use smart links with non-Amazon affiliate programs?
Yes. While Amazon is the most common use case (because Amazon has separate storefronts per country), smart links work with any affiliate program. You can create geo-rules for impact.com, ShareASale, CJ Affiliate, or any merchant with international stores. The link simply routes the viewer to whatever destination URL you set for their country.
Do smart links affect SEO or YouTube rankings?
No. Smart links are standard HTTP redirects (301 or 302) and have no effect on YouTube video rankings. YouTube does not penalize videos for using redirected links in descriptions. The links are clicked by viewers, not crawled by YouTube’s algorithm. Branded short URLs like youfil.to actually look cleaner in descriptions than raw affiliate links, which can improve click-through rates.
Start Capturing the Revenue You Are Already Earning
Smart links solve a problem that most affiliate marketers do not even realize they have: lost commissions from international viewers and mobile users. The technology is straightforward, the tools are available at every price point, and the ROI is immediate because you are monetizing traffic you already get.
If you are still using raw affiliate links in your YouTube descriptions, you are leaving 15-30% of your potential commissions on the table. Start with your top 10 videos, replace those links with smart links, and watch what happens to your earnings over the next 30 days.
Ready to start? Create your free account at Youfiliate.com — 10 smart links, unlimited clicks, and a YouTube auto-convert preview that shows every affiliate link in your descriptions before you change a single thing.
You're losing commissions on every international click
Smart links route viewers to their local store automatically
Try It Free — 10 Smart LinksNo credit card required.
Done reading? Try it yourself
Create a geo-targeted smart link in 60 seconds
Start Free — No Credit Card10 smart links free forever. Unlimited clicks on every plan.